Pop Up Globe FAQ


How much are tickets?

Tickets range from $20.33 to $304.67. It's cheaper to see a weekday matinee than an evening show or weekend matinee! Groundlings are the same price for every performance - $20.33 - and are arguably the best tickets you can get. Tickets for Around The Globe In 60 Minutes range from $15.23 to $25.42.

There's special offers on tickets when you get a group together or book more than one show! Details on ticket types can be found here.


Which tickets do you think I should book?

If you are able stand for three hours, get groundling tickets! Even my friends that have booked seated tickets have all expressed their wish to be among the peasants umm I mean the groundlings instead. Think of the mosh pit at a concert. You're right in the middle of the action. It's like you're a part of the performance, rather than just a ineffectual audience member. Characters turn to you for guidance and support. Their stories spill over the stage, pouring out into the yard and overcoming everyone with a sense of involvement and liveliness that you just cannot get anywhere else. The groundlings is a character unto itself.

That said - if you cannot stand for three hours, the seated tickets are still excellent! If it rains, we'll be the ones getting wet while you're all cozy and warm in your boxes looking down on us. The Royal Rooms look absolutely luxurious. They're on the stage, so you'll probably still get the same actor interaction as the groundlings, only you're less likely to be called an "English pig" or a "peasant".

Fair warning, though, everyone in the theatre can see what you're doing! So don't bring your Uncle Frank if you think he'll probably fall asleep at Othello. The Royal Rooms include a complimentary hamper of food and a program for each person. Lucky ducks. There's only 16 seats available for each show, so don't delay! Try for a weekday matinee for best availability and to save a bit of money!

From there, the seating is really a matter of preference. The Globe has three levels of seating, like most theatres. There is a lower level, a middle level, and an upper level. Most people in my circle of friends will be looking to spend as little as possible. If that's the case, then D Reserve is on the lower and upper levels at $55.95 on a weekday matinee and $61.40 for evenings and weekend matinees. You can find out more details on the seating at the page I've linked above!


Which play should I see?

This is a tough question to answer. Each of them are fantastic. As I'm writing this, I haven't seen Othello and Around The Globe yet, but I feel I can already vouch for them. My faith in the Pop Up Globe, the three companies, and everyone involved is totally unwavering. Here's an excellent review of Othello and another of Around the Globe, if you won't take my word for it.

There are four plays and one special production in the season. Henry V, As You Like It, Much Ado About Nothing, Othello, and Around the Globe in 60 Minutes. In a perfect world I would recommend that you see all of them. Each have something different to bring to the table, with new experiences and life lessons. Shakespeare's works are so versatile and timeless. It feels that I can pick one of them up at any stage in my life and find something new, that I never noticed before, like I have at the Pop Up Globe.

Speaking in general terms - the plays cover some popular genres, which might help you decide which one to see. Henry V is a history, Othello is a tragedy. As You Like It and Much Ado About Nothing are both comedies. Or you might want to start with Around The Globe in 60 Minutes, which tells the history of the second Globe Theatre. It's billed as a family friendly performance and all the tickets are ridiculously cheap!

Henry V was the first production we saw, so I think it will always hold a special place in my heart. Being a history, you may be expecting something grim and tedious. But it's neither. I laughed a hell of a lot more than I expected to. It's also so incredibly involved. Henry spends a great deal of time mingling with the groundlings and calling them to arms when the time comes to fight for king and country etc etc. It was an emotionally charged experience, that was on my mind for days afterwards.


That said, both of the comedies were such joyous experiences. It seems that we're surrounded by so much hate and injustice these days. The newsreaders say "good evening" and then proceed to tell us why it's anything but a good evening. But at the Globe, all of that goes away. It has this healing power, which is all the more potent when you see As You Like it or Much Ado About Nothing.

As You Like It tells the story of two girls who run away from the court to find refuge in the forest of Arden. Hilarity ensues, as it is wont to do. There's singing, there's wrestling, there's love, there's confusion, a gender bent character, mistaken identity... Did I mention singing? What about the sheep? The sheep are very important.

You might be more familiar with Much Ado, what with the recent filmed production that featured David Tennant and Catherine Tate in two of the lead roles. Sorry not sorry, this production was better. Beatrice is my absolute hero. The Queens company perform this play with so much heart and soul. I think it's the quintessential Pop Up Globe experience.

Another thing that may help is knowing the schedule! There's a calendar here showing all the dates and plays for the rest of the season, which was extended today! I know you're all going to delay booking tickets, now that the season is until January, but I'd still recommend booking asap! Tickets are selling fast and it'll be January before we know it!


Isn't Shakespeare only for scholars and highbrow thinkers? What if I don't understand what they're saying? I hated Shakespeare in high school.

I hear this a lot. Actually, I hear this every time I bring up Shakespeare with my non-Shakespeare friends. But it's just ridiculous approaching Shakespeare like this. His works are timeless. Why else would people still be performing his plays, over and over again to much acclaim? Each play represents such relevant experiences and emotions. And it's common to dislike things, after you've studied them in high school. But that's usually down to the teaching and not the material. Shakespeare's works have so much to offer, if you'll only give them a chance.

There were so many children at every performance I've seen. There was a boy at Henry V who moved through the yard, following Henry with both his heart and his mind. He was enraptured. I've never seen anyone as full as admiration as he was. At Much Ado, the yard was full of children and the sound of their laughter. Ursula and Hero gave them chocolate fishes. If children can understand and even admire and laugh at Shakespeare, I don't see why an adult cannot.

Besides all of that, these productions are filled with contemporary references to popular culture. The characters are constantly engaged in asides to the audience that we, 21st century people watching a theatre performance in 2017, can understand. If all you've done is read the plays, then I'm not at all surprised that you're having difficulty enjoying them. Imagine reading the script for a film rather than seeing it. You'll still know what's going on, of course, but it's better to just watch the film.

The Pop Up Globe's season has been extended until January, with performances almost every day. It's an experience like nothing else. It's Shakespeare, the way it was meant to be performed. Book your tickets now through Ticketmaster.
"Absence, Hear Thou My Protestation"


Well, this one has been a long time coming. I think I started this in late August, put it away for a while, and picked it up again just recently. I had already finished the bulk of the work, I just hadn't found the time between other projects and school/work to do all the remaining detail work. Claire's riding jacket in Outlander has always been one of my favourite costume pieces of the series. Caitriona Balfe looks stunning in everything, but she's particularly radiant when wrapped up in luxurious white furs and what I'm guessing is a brown tweed fabric.

I had very limited fabric for this project. The brown tweed was $20 per metre from a small fabric store in Oakleigh, so I only bought two. And the fur was hideously expensive - even when on sale at Lincraft - so I only bought one metre of that. It meant my sleeves came up a bit short, the hood isn't nearly as roomy as I would have liked, and the fur isn't as luxurious and overpowering as it was in the series. But I don't mind. Making costumes on a budget is so much more challenging and means I don't want to claw my eyes out every time I look at my bank balance.

I always knew that I wasn't going to find a pattern for this costume, but I was lucky enough to find one on eBay that was similar enough to work as my base pattern. It was Sew & Sew B5446. It doesn't have a hood, the sleeves are bell sleeves, and the collar is just extremely unhelpful. All I took from the pattern was the bodice - and even that still required customization. The best way to do this is to just copy the pattern onto some fabric and then make all of your adjustments on a dress form. The sleeves and hood were taken from two other patterns and the peplum was made like a circle skirt.

Putting the pieces together from there was all very straightforward. I put some box pleats into the back and sides of the peplum before attaching it to the bodice. I don't think there's any pleats in the top of the actual costume, but I put some in the bodice of mine anyway. The hood presented a bit of a problem. I didn't have enough fabric to make it one piece, so I cut two. But then it wasn't big enough, so I used what little fabric I had left to make another piece for the underside of the hood. It looks a lot better with the fur attached, although I'd still love to go back and remake the hood later so that it has a more natural shape.

The lining was where I hit a roadblock. I would like to say that I was too busy with my new job and other projects, but mostly I just lost interest. The lining pieces were cut from a plain brown cotton when I started the project and needed to be hand stitched to the bodice, sleeves, and peplum. The difference it made to the peplum is miraculous. It used to be so limp when put on over a bum roll and petticoat, but now it flares out! Just the way I wanted.

After the lining, all that was left were the buttons and fur. And let me tell you something about fur. It sheds. It sheds everywhere. No matter what you do, no matter how you cut it - it sheds. I knew it was going to be an issue when I purchased the fur back in Sydney, so I decided to line it as well with a white cotton before hand sewing it to the hood and sleeves. It was still messy to cut and sew, but at least it won't shed every time I put the jacket on.

And that's it! All done! I can't wait to share my next Outlander costume with you all - hopefully next time it won't take as long.

"What's your name, darling?" "Captain."


I would apologize for not posting anything in such a long time, but then I would probably have to do that every time I post something. Life is just too busy! Usually when I complete a project - it's under extreme pressure and in only three or four days. I was hand sewing my Starfleet uniform hours before I had to board my flight to Sydney for Oz Comic Con. I just never have the time until the week before a costume needs to be finished - when I'm forced to neglect my obligations and put all of my energy into that costume.


My Captain Peggy Carter costume is no exception. I think I made the pattern in a couple of hours and then worked on the costume non-stop the week after that. It wasn't stressful, though, which is a rareity. I learnt a lot while making this costume and it is the last one I made before finally picking up my overlocker. This costume just felt like a huge stepping stone in my journey to becoming a better seamstress, so I wanted to document it here.

I knew going into this that I wanted the costume to be more inspired by Steve Rogers' Captain America than the Captain Carter we see in Marvel's Puzzle Quest. Although the latter has a lovely and unique design, I wanted to go with the more easily recognizable costume - especially as I'd be premiering the finished product at Melbourne's biggest convention of the year.


The final design is mostly inspired by Steve's outfit when he rescues Bucky and his regiment in The First Avenger. This was half because I liked the grittiness and reality of it and half because I didn't actually have enough time to make a matching pair of blue trousers.


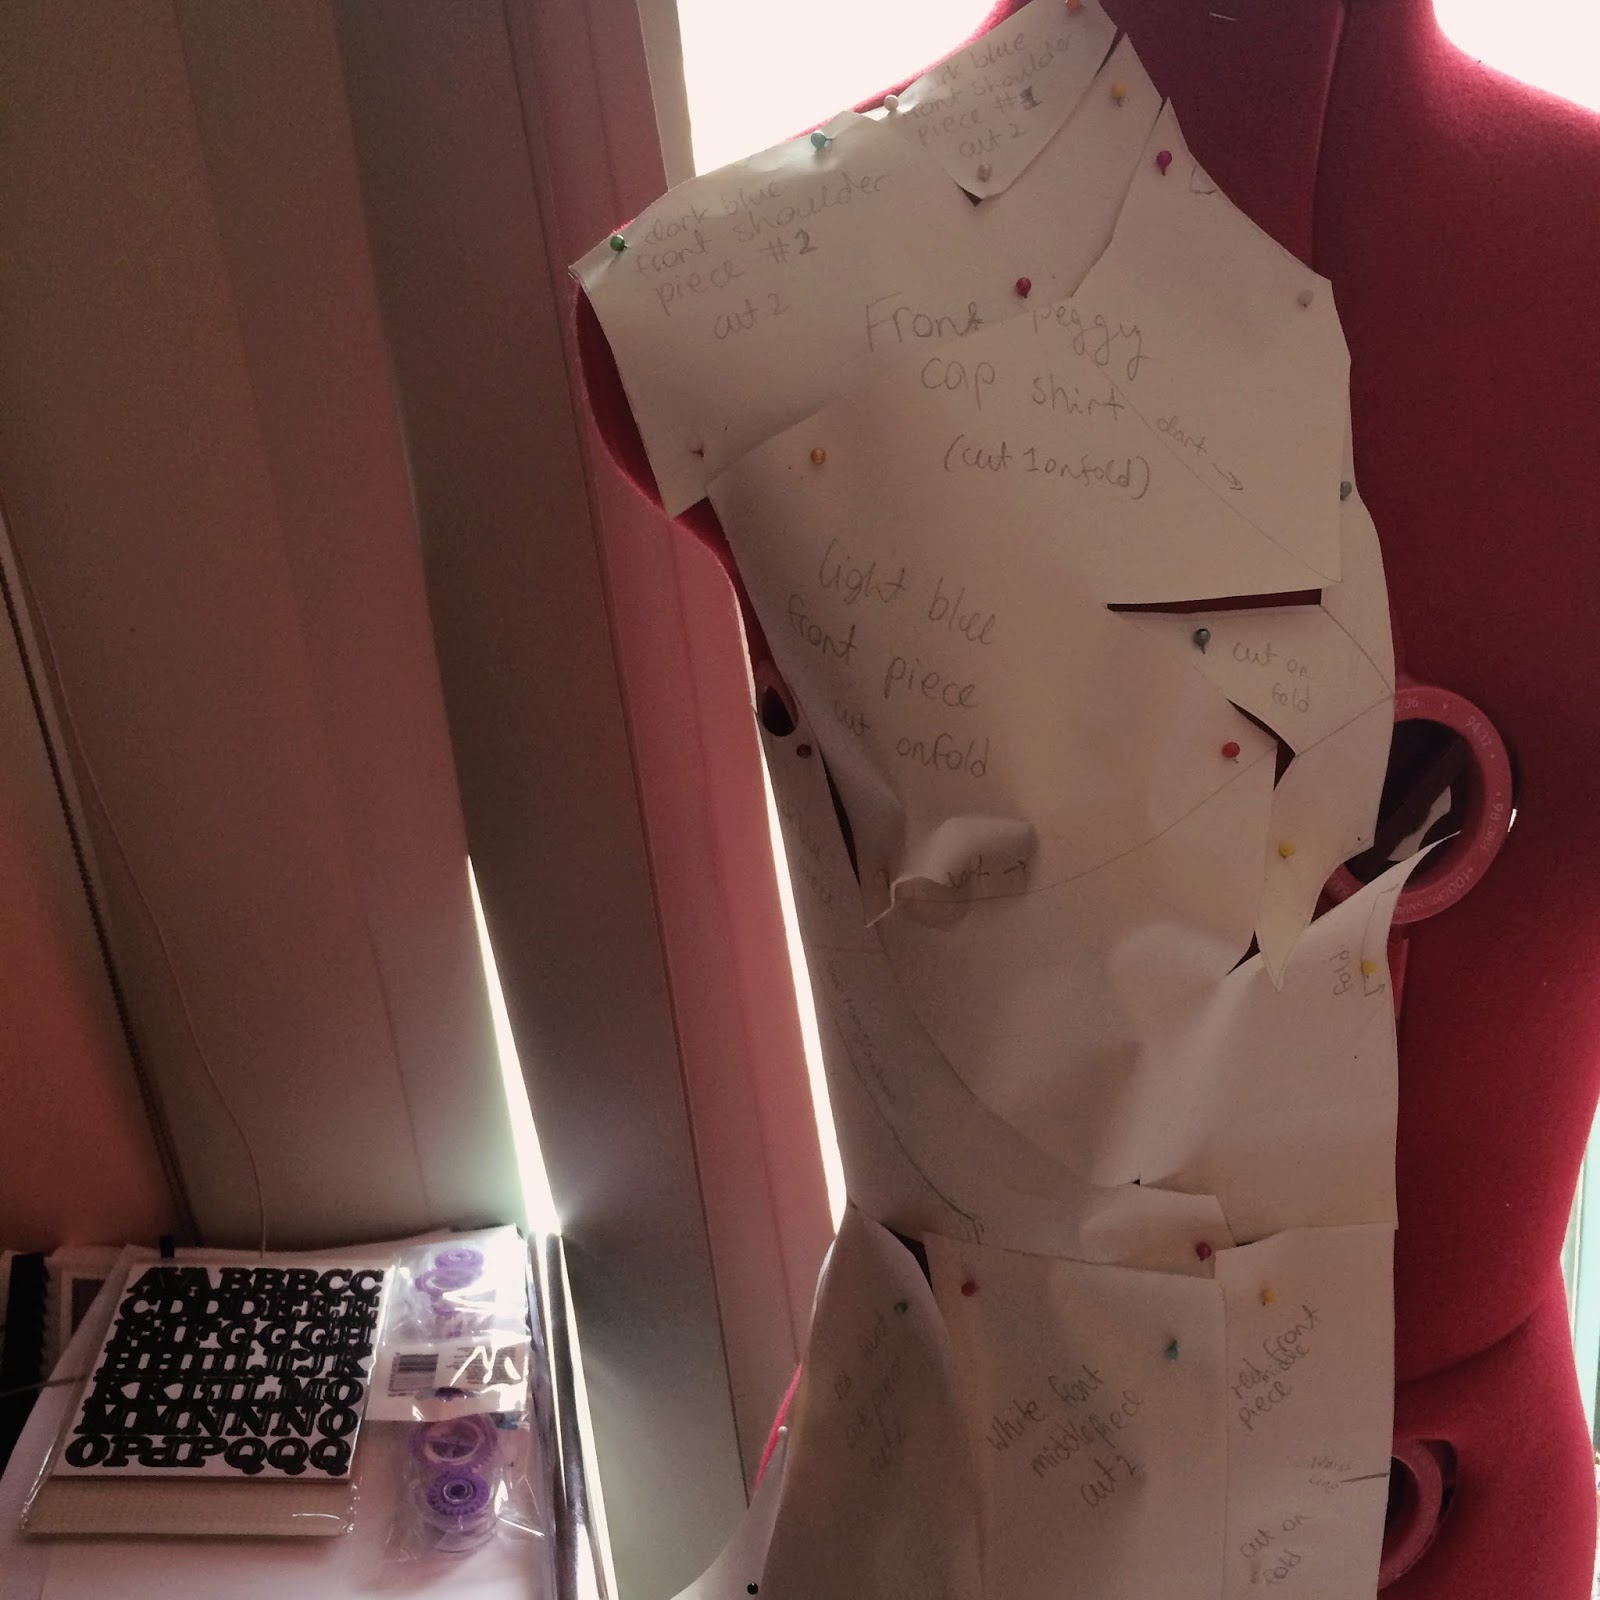
I copied a long sleeve shirt pattern onto some drafting paper and then added in all the patches and designs and bits and bobs. In the end, there was a ridiculous amount of pieces in the top half of the shirt. It wasn't necessary - I could have just made them patches and sewn them onto one single main piece. But it's a bit late for that now, innit? Anyway, the pieces that are sewn into the sleeves and bodice, rather than attached as patches, have a raised look that gives the illusion that I am actually muscular. And I wouldn't be Captain America without those.


There was so much customizing of this piece. I wanted it to be as fitted as possible, but it always somehow ended up loose in some places. It's my own fault, really. My first few projects when I originally discovered sewing ended up too tight to wear, so now I overcompensate my seam allowances in the hopes that I won't make the same mistakes again.


I got the length of the zip wrong and had to run out to Lincraft and buy one that I could sew into place at uni. It still wasn't the right length and falls short at the neckline, but - as usual - I didn't have time to make adjustments so that it would be the right length. It was actually my first time using an open end zip which is now a very close contender for the title of My Favourite Zip Ever. I'll definitely use it again on one of my next costumes.

Photo by Ganjaninja Photography
Of course I'd love to make this costume again, especially now that I have my overlocker. I'd also love to make other versions of Captain America - especially his USO costume from TFA, complete with his original shield. But this one will do very nicely, until then.

Photo by Kitt Photography
You can find more photos of the costume in action on my Facebook page!

Porcelain, to Ivory, to Steel


A year ago this week - I bought my first sewing machine. And a year later, I've just finished a major costume and I'm about to finish a riding jacket inspired by a costume piece in Outlander. I've come so far since my first project on a sewing machine and I'm so glad I stuck with this hobby and got through all the moments where I wanted to give up on it.

I wrote a post a while back about the wolf embroidery on my Sansa gown, but I only just finished working on the rest of it so that I could wear it for the first time at the Bendigo Records, Toys, and Comics Fair. It got a lot of compliments, especially about the embroidery. I'm very proud of the whole costume, in spite of all its minor flaws. Velvet is pure evil, 10/10 would not recommend working with velvet.


The dress was actually the first piece I finished, using Simplicity 9891. I then moved on to the embroidery, which took about a month of work. After that I ordered the fabric for the main piece of the cloak and then set the costume aside while I gave my time to other costumes I'd left in the back burner.

The cloak fabric is also velvet, but it's a two way stretch dance velvet from an Australian store. It's less thick than the dress fabric and flows very nicely when I walk. The fur is faux fur and actually the second piece of faux fur I ordered since the first never actually arrived.

Buying fur fabric is extraordinarily expensive and would have been hard to work with, so in the end I bought a fur bridal wrap. It's whip stitched to the top of the cloak and keeps its shape exceptionally well.


I also added the detail of snowflakes to the cloak. There is a pattern on Sansa's cloak in the show, but it would have been too hard to replicate without spending weeks scouring the Internet for a fabric with the exact pattern. So I decided to emboss my fabric with a stamp and an iron. 

The costume is complete, but I'd still like to add more snowflakes to the cloak and find a way to secure the top of the cloak to the shoulders of the gown. It shifts a lot while I'm wearing it so I think I'll use hooks and eyes or little snaps to keep it in place. It's such a comfortable, warm costume. It's a shame the weather here is starting to heat up again.

 source: Alchemi Glow Photography


I have been very inactive on this blog as of late, and for that I apologize, but I do have a lot more to share with you over the coming weeks. I made a new Star Trek uniform for the 50th anniversary and I've been taking lots of photos of my process while making Claire's riding jacket which I mentioned above. So keep an eye out for those posts and more!

The North Remembers

I've been working on this piece in my spare time for a couple of weeks now and I finally finished it the other night! The embroidery on Sansa's season six gown is so eye catching and yet I could not find a single photo of it that gave me enough details to go into this project without reservations or nerves.

I created a pattern, traced from the most high quality image I could find, and yet I was STILL nervous. What about that part I can't see at all in any of the photos? How was I going to do that? What kind of beads would I use? What search term should I use for those beautiful flat shell type beads at the base of the wolf?

Even when I wasn't working on it - this piece was always at the back of my mind. Using stabilizer paper with my pattern on it just made me even more anxious, since I was never really sure if it was turning out okay or not. But I got there, eventually, and it doesn't look half bad if I do say so myself!

I started my work on this piece by finding as many images of the costume as possible. Then I took the best image out of the whole bunch and used photoshop to make a pattern, which you can see above with some extra notes - if you'd like to make this piece. (I'd recommend having a reference image on hand of the actual embroidery while you're working, it helped a lot!)

Usually to get my pattern onto the fabric for my embroidery work, I would trace it. But this is dark fabric, so I had to use a stabilizer. There's a huuuge range of stabilizers to choose from (one of them dissolves in water??), but I went with a simple tear-away one. I traced my pattern onto this and then cut it out and pinned it to my fabric. Et voila. All ready to start the embroidery!

I took this photo as a reminder that after lining my wolf - I tore away some of the stabilizer. I had to do this because I used a satin stitch to fill the wolf and I wouldn't have been able to get to the stabilizer after doing that.
It may be hard to tell, but I actually used four different colours for the embroidery.  They were:
Sullivans #45324 (Lining for the wolf + half of the leaves)
Sullivans #45150 (Filling in the wolf + the other half of the leaves)
Sullivans #45085 (Eye and ear of the wolf + the vines)
Sullivans #45091 (Just the vines)

I wouldn't normally pick Sullivans - I only went with it because they were only 69 cents each and I was purchasing quite a few - but in the end it doesn't really matter. Any other brand would have done just fine. The wolf is the only part with very clear colouring, whereas the vines were just guesswork. I saw someone use violet for their vines and I liked the idea so I used #45091 for mine. It's a very very light shade so it's not too gaudy.

There was also a lot of beading in the vines and I could barely make out the colours of them, so I just guessed. I did a lot more guesswork when it came to the beads. They were:
Ribtex Seed Beads in black (only for the vines)
Shamrock Craft Assorted Neutral Glass Beads (for the beads clustered at random around the wolf and the vines. I bought them secondhand at an op shop/thrift store, but they're very easy to find. They came in various neutral colours and look lovely)
Ribtex Seed Beads in metallic silver (I threw these in between the neutral glass beads, I like the way they catch the light)
Mix Shell Chip Beads (I really struggled with the flat beads underneath the wolf. I ordered two packets of beads and the second packet was only just good enough for me. I think the beads are actually Paua Shell beads? But I had no luck with that, so I just searched variations of "flat shell beads" until I found these on ebay. They're not perfect, but they'll do.)
Pearl and Shell Mix (I bought this mix packet originally for the flat beads, but they arrived and were far too big. I still ended up using some of the smaller beads with the flat beads, though. They're the green and blue beads at the base of the wolf, seen below.)

And of course the material I used was the same velvet used for the dress. When you're cutting out your dress, make sure there's enough left for this piece! I ran out very quickly! That's why my piece didn't quite fit the embroidery hoop.

When the embroidery was all done I carefully cut and tore away the stabilizer. You may want to take it off BEFORE you do your beading, because I had to sew all of them down again after tearing all that paper away. Some of them even fell off! If you have your vines and wolf in place, you should be alright adding your beading without the stabilizer.

Once that was all done and the beading was 100% secure, I lined all of my pieces with a soft black fabric I found in my scrap pile so all the ugly knots and such underneath would not be exposed. Then I machine stitched the pieces together and there it is! All done!
I still need to decide how the back of the piece will attach together (I'm thinking ribbon for a "vintage" touch). Next up is the cloak - which will feature some really lovely embossed snowflakes. It'll be a lot of work, but I'm looking forward to taking a break from all this hand sewing!


Progress Update

I haven't posted anything for a while, so I thought I'd do a progress update! There's not a lot I can do right now on my main projects, apart from source fabrics and work on the embroidery for Leia, so I've started Sansa's season six dress!
It's a quick project that requires minimal effort, but I'm very excited about it! The only set back I've had is the fabric, which is definitely the wrong colour. I rushed into buying it during a Spotlight sale, armed with only a few promotional photos and screencaps from the show. I'm assured by friends that the blue looks better than the green actually used, but it's something that's really going to bug me! Oh well.

I also got started on the direwolf embroidery for the costume last night! I'm using tear away stabilizer for the first time, it's very exciting. I want to get this piece as accurate as possible, however hard that may be. It's just such a stunning piece in a show filled with costumes that inspire me. 
My fabric for the top layer of my Cinderella skirt arrived! It's a cationic chiffon from ebay. It's a different colour from every angle, exactly like the fabric used in the film. I can't wait to get started on this project! 

My new hoop skirt also arrived last week! It's as big as my tiny bedroom, I have nooo idea how I'm going to make my way around a convention in this thing. I've taken the netting off the skirt since taking these photos, so it's a little different! I'll hopefully be able to use this for Cinderella and my two new Claire gowns!


Lizards and pumpkins and things!


With Supanova and Oz Comic Con over, it's time to move on to my next project! I'm currently juggling quite a few. I'm not sure which will be completed first, as they all require a lot of time and effort! They are: Leia's formal Bespin outfit, Claire's wedding dress, Claire's season two red dress, and Cinderella's ball gown from Disney's 2015 live action film! I've also started researching a Captain America costume! I'd like to create an original design, based on the idea of Peggy Carter being given the super soldier serum instead of Steve Rogers.


(art by alexschlitz on tumblr)

Research for Cinderella's gown has been a little harder than expected. The materials used for the actual dress aren't affordable, so I've been looking at cosplay pages and forums to see what everyone else used. But they all seem rather tight lipped about it. Hardly anyone has documented their process or discussed materials in forums with other cosplayers. All the forums about Rey's costume in The Force Awakens helped me so much when making it this year, I was really hoping I would find the same thing for this MUCH more complicated costume!
But I believe I can do this on my own. I've settled on a material for the outer skirt and ordered a hoop skirt online. I'd like to try a few different options from local fabric stores, to see what works. It's a difficult dress with a difficult colour. It varies so much from the film to promotional photos to what it actually looks like when seen in person. I have a list of fabrics I'd like to use, although it may change over time.

From the bottom to the top layer: ivory organza, white silk organza, blue organza, lilac chiffon (all for the petticoats, some fabrics will only be used as ruffles), white organza, blue organza, lavender organza (all for the inner skirt, could mix the colours up a bit and use different shades of blue), and blue cationic chiffon. The cationic chiffon is the only fabric I'm really set on. I've found some cheap listings on ebay and the fabric has been used specifically by a cosplayer I admire.

Another gown I'm working on is Claire's wedding dress. We're about to head into another long "droughtlander" and I think it's the perfect opportunity to get started on this beautiful gown. Terry Dresbach is my hero. The costumes in Outlander are some of the most detailed and stunning I've ever seen. Reading her blog, you can tell how much she loves this series and what she does.

I've ordered a sample of metallic linen fabric for the main pieces of the gown. Linen was definitely used for the skirt and the bodice in the show and, although I've seen no mention of it being metallic linen on Terry's blog, I thought it would work very well! When Jamie sees Claire in that dress for the first time, he said it was as if he had stepped outside on a cloudy day and suddenly the sun came out. Metallic linen and metallic embroidery will go a long way towards recreating that unforgettable moment.

Most of Claire's costumes in the series have been woolen skirts and bodices with knitted scarves and gloves to keep her warm in the Scottish Highlands. But this season - Jamie and Claire moved to Paris to try and stop the doomed Jacobite uprising. Something I couldn't wait to see Terry Dresbach and the costume team recreate was Claire's red dress. And they did so well. I've already purchased some gorgeous red fabric for this costume but, before I do anything with it, I'd like to decide what I'm doing for the skirt!

I feel that I will need a pannier for this costume. I used something like a pannier for my original Claire costume, but it was a smaller less complicated creation called a "bum roll" which exaggerated my behind more than my hips. Panniers online are rather expensive, so I guess I'll have to make one! First, though, I would like to try draping the fabric over my Cinderella hoop skirt and the bum roll, just to see how it looks. If it works even just a little bit, I might make another larger bum roll and just stick with that. They're very easy to make and don't require expensive boning or hoops.
I actually started working on Leia's formal Bespin costume a while ago. I purchased all of my fabrics, found an embroidery pattern, and started the embroidery. The bulk of the work is on the embroidery, so I have no idea when this costume will be finished. In the coming weeks I would like to find all the remaining pieces I need, though. I still haven't found the shoes! And a lot of other cosplayers used a canvas fabric to stiffen up the belt, so I might look for that as well. I don't have any sketches for this costume, as I feel fairly confident about all of the pieces. I just hope I can get it done by the next convention, at the very least. Time to get cracking on that embroidery!